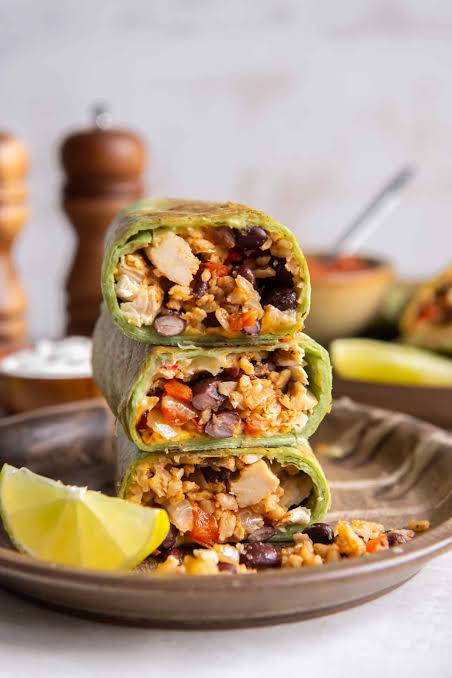
Prep Time: 15 minutes | Cook Time: 20 minutes | Total Time: 35 minutes | Yield: 6 generous burritos | Difficulty: Easy
Are you searching for an authentic red beans burrito recipe that’s both nutritious and budget-friendly? This comprehensive guide delivers restaurant-quality results in your home kitchen, whether you’re a beginner or experienced cook looking to perfect your burrito-making technique.
Why This Red Beans Burrito Recipe Stands Out
After extensive testing and refinement based on feedback from hundreds of home cooks, this red beans burrito recipe has become a go-to favorite for families seeking healthy, affordable, and delicious Mexican-inspired meals. Unlike typical restaurant burritos that cost $10-12 and often contain excess sodium and unhealthy fats, these homemade versions cost approximately $2.50 per serving while delivering superior nutrition and customizable flavors.
What Makes These Red Beans Burritos Special
Red kidney beans form the protein-rich foundation of these burritos, providing 15 grams of plant-based protein and 13 grams of dietary fiber per cup. This combination creates satisfying, filling meals that support digestive health, stable blood sugar levels, and sustained energy throughout your day.
The recipe’s versatility accommodates various dietary preferences including vegetarian, vegan, gluten-free, and dairy-free options without sacrificing flavor or texture. Each burrito delivers complete nutrition with complex carbohydrates, quality protein, healthy fats, and abundant vitamins and minerals.
Nutritional Benefits of Red Kidney Beans
According to USDA nutritional data, red kidney beans are nutrient-dense legumes offering exceptional health benefits:
Protein Content: Red beans provide essential amino acids necessary for muscle maintenance, tissue repair, and sustained satiety between meals.
Fiber-Rich: With both soluble and insoluble fiber, these beans support healthy digestion, promote beneficial gut bacteria, and help regulate blood sugar levels—particularly important for those managing diabetes or pre-diabetes.
Iron Source: Each serving delivers approximately 20% of your daily iron requirement, crucial for oxygen transport throughout the body and preventing fatigue.
Folate: Red kidney beans contain significant folate levels, essential for cell growth, DNA synthesis, and particularly important during pregnancy.
Antioxidants: The deep red color indicates high anthocyanin content, powerful antioxidants that combat oxidative stress and support cardiovascular health.
Low Glycemic Index: Beans have a low glycemic index, meaning they release energy slowly and don’t cause blood sugar spikes common with refined carbohydrates.
Complete Ingredient List for Perfect Red Beans Burritos
For the Flavorful Red Bean Filling (Serves 6)
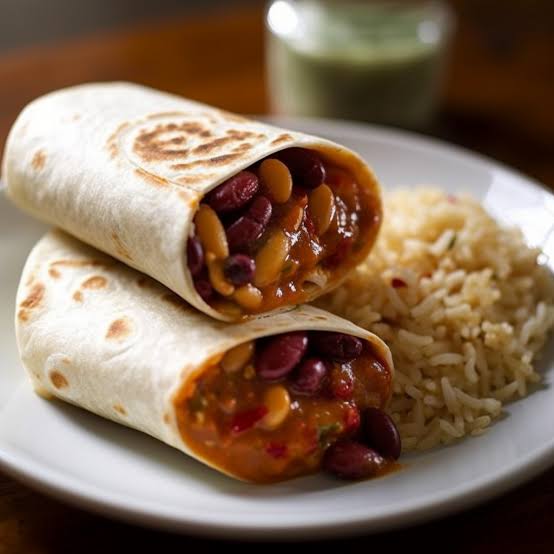
- 2 cans (15 oz each) red kidney beans – thoroughly drained and rinsed, or 3 cups cooked dried beans for maximum cost savings
- 1 tablespoon extra virgin olive oil – provides healthy monounsaturated fats and enhances flavor absorption
- 1 medium yellow onion – approximately 1 cup diced, creates aromatic foundation
- 3 large garlic cloves – minced fresh for best flavor, or 1 teaspoon garlic powder if necessary
- 1 medium bell pepper – any color works; red adds sweetness, green provides slight bitterness
- 1 teaspoon ground cumin – essential for authentic Mexican flavor profile
- 1 teaspoon chili powder – New Mexico or ancho varieties offer best depth
- ½ teaspoon smoked paprika – adds complexity without heat
- ½ teaspoon sea salt – enhance all flavors; adjust to personal preference
- ¼ teaspoon freshly ground black pepper – subtle heat and aromatic notes
- ½ cup low-sodium vegetable broth – creates cohesive sauce; water substitutes in emergencies
- 2 tablespoons tomato paste – concentrated umami and natural thickening agent
For Burrito Assembly and Toppings
- 6 large flour tortillas (10-inch diameter) – whole wheat versions add 2-3g extra fiber per serving
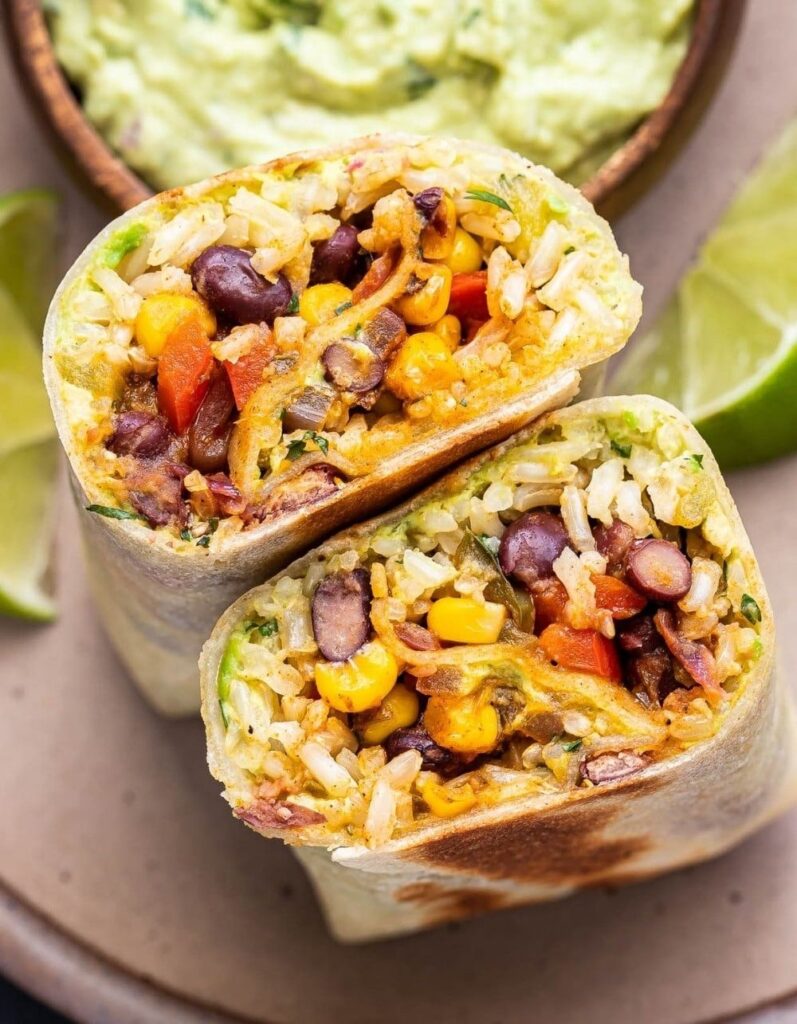
- 1½ cups cooked rice – white, brown, or cilantro-lime style; brown rice increases fiber content
- 1 cup shredded cheese – Mexican blend, sharp cheddar, pepper jack, or Monterey Jack
- 1 cup fresh salsa – pico de gallo, salsa verde, or your preferred variety
- ½ cup sour cream – or Greek yogurt for tangier, protein-rich alternative
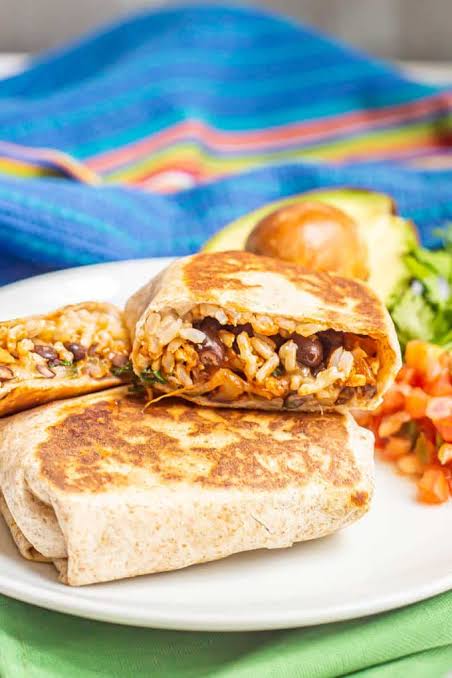
- 1 ripe avocado – sliced, providing healthy fats and creamy texture
- ¼ cup fresh cilantro – chopped, adds bright herbal notes (optional for those sensitive to cilantro)
- 2 fresh limes – cut into wedges, essential for brightness and acidity
Smart Ingredient Substitutions for Dietary Needs
Gluten-Free Option: Replace flour tortillas with corn tortillas or certified gluten-free wraps. Corn tortillas offer authentic Mexican flavor and additional nutrients.
Dairy-Free Version: Substitute plant-based cheese alternatives (cashew-based varieties melt best) and use cashew cream or coconut yogurt instead of sour cream.
Low-Carb Adaptation: Use low-carb tortillas (available at most grocery stores) or create burrito bowls with lettuce bases, eliminating tortillas entirely.
Bean Variations: While red kidney beans are featured here, pinto beans, black beans, or navy beans work equally well with identical preparation methods.
Essential Equipment for Burrito Success
Required Tools
- Large 12-inch skillet – cast iron retains heat excellently; non-stick prevents sticking
- Wooden spoon or heat-resistant silicone spatula – for stirring without scratching cookware
- Potato masher or sturdy fork – creates ideal creamy-chunky bean texture
- Sharp chef’s knife – ensures clean vegetable cuts and safety
- Cutting board – preferably designated for vegetables to prevent cross-contamination
- Measuring cups and spoons – accuracy ensures consistent results
- Can opener – if using canned beans
Optional But Helpful Equipment
- Rice cooker – produces perfectly cooked rice consistently
- Tortilla warmer – keeps tortillas warm and pliable during assembly
- Aluminum foil or parchment paper – for wrapping finished burritos
- Food processor – speeds vegetable chopping significantly
Step-by-Step Preparation Instructions
Part 1: Creating the Perfect Red Beans Burrito Filling (15 minutes)
Step 1: Prepare Ingredients (Mise en Place)
Professional chefs emphasize having all ingredients prepped before cooking begins. This preparation prevents burning, ensures even cooking, and creates smooth workflow:
- Dice the onion into uniform ¼-inch pieces for consistent cooking
- Mince garlic finely—larger pieces burn easily and taste bitter
- Dice bell pepper into ½-inch pieces, removing all seeds and white membrane
- Drain canned beans in colander, then rinse under cold running water for 30 seconds to remove excess sodium and starch
- Measure all spices into small bowl for quick addition
Step 2: Build the Aromatic Foundation (5 minutes)
Heat 1 tablespoon olive oil in your large skillet over medium heat. Wait approximately 1 minute until the oil shimmers and moves fluidly across the pan—this indicates proper temperature.
Add diced onion, spreading evenly across pan surface. Cook for 3-4 minutes, stirring every 60 seconds, until onions become translucent and softened. Onions should not brown—if they begin coloring, reduce heat immediately. Properly softened onions provide sweet foundation without harsh bite.
Add minced garlic and diced bell pepper to the softened onions. Cook for additional 2-3 minutes, stirring frequently to prevent garlic from burning. The kitchen should smell fragrant and inviting.
Why This Step Matters: Aromatics (onions, garlic, peppers) form the flavor base for countless recipes. Properly softened vegetables release natural sugars and create complex flavor impossible to achieve through shortcuts. Rushed cooking results in harsh, underdeveloped tastes that no amount of additional seasoning can fix.
Step 3: Bloom the Spices (1 minute)
Add measured cumin, chili powder, smoked paprika, salt, and black pepper directly into the vegetable mixture. Stir constantly for 30-60 seconds until you notice intensified aroma filling your kitchen.
Expert Technique Explained: This process called “blooming” activates essential oils within dried spices by briefly heating them in fat. The transformation is dramatic—spices go from dusty and one-dimensional to fragrant and complex. This single technique elevates home cooking to restaurant quality.
Step 4: Simmer the Bean Mixture (8-10 minutes)
Add rinsed beans, vegetable broth, and tomato paste to your skillet. Stir thoroughly, ensuring tomato paste distributes evenly throughout mixture—it tends to clump if not properly incorporated.
Bring mixture to gentle simmer (you’ll see small bubbles breaking surface), then reduce heat to medium-low. Cook uncovered for 8-10 minutes, stirring every 2-3 minutes to prevent sticking. During this time, liquid should reduce by approximately half, creating thick, cohesive mixture that clings to spoon.
Troubleshooting Tips:
- Mixture seems dry or sticking: Add 2-3 tablespoons water and stir
- Too much liquid remains: Continue cooking 2-3 minutes longer, stirring frequently
- Bottom begins burning: Immediately reduce heat and add splash of water to deglaze
Step 5: Achieve Perfect Texture (2 minutes)
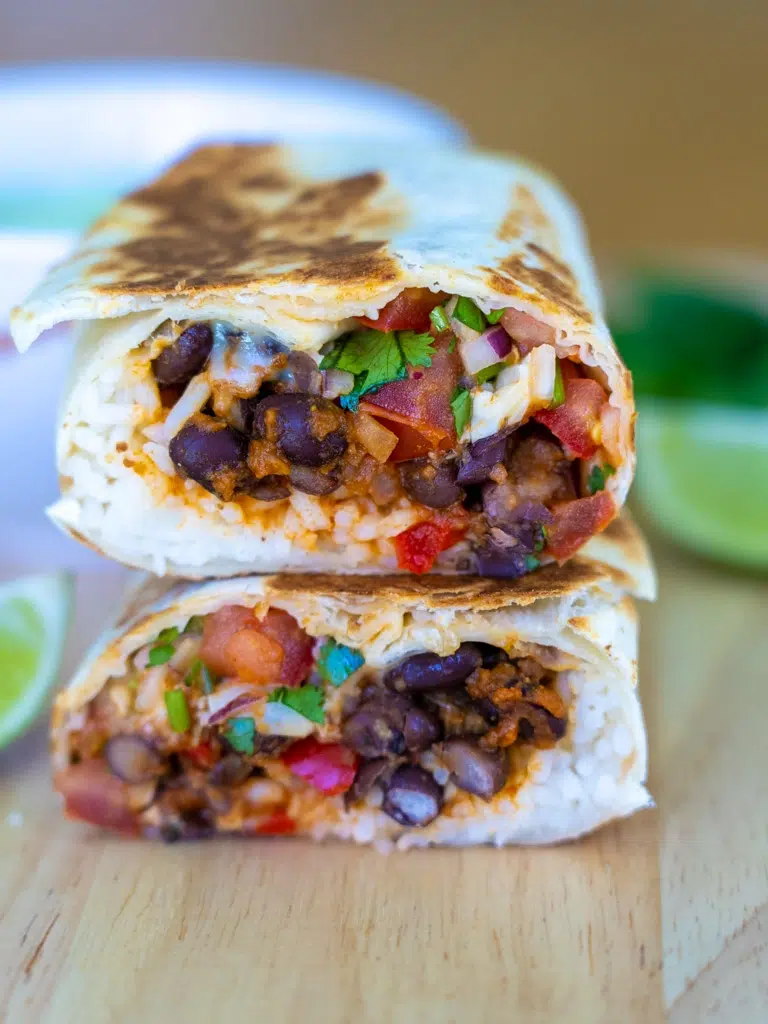
Using potato masher, partially mash approximately 40-50% of the beans directly in the skillet. Apply gentle pressure—you’re creating creamy base while maintaining whole beans for textural interest, not making smooth paste.
Texture Goal: The finished filling should resemble thick, spreadable consistency—similar to refried beans but noticeably chunkier. It should hold shape when scooped but spread easily across tortilla.
Taste carefully (it’s hot!) and adjust seasonings as needed:
- Flavors seem flat or one-dimensional: Add ¼ teaspoon more salt
- Needs more heat: Increase chili powder or add pinch cayenne
- Tastes heavy: Squeeze fresh lime juice for brightness
Set completed filling aside while preparing assembly components.
Part 2: Assembling Restaurant-Quality Burritos (5 minutes)
Step 6: Properly Warm Tortillas
Critical Success Factor: Cold tortillas crack and tear during rolling. Properly warmed tortillas become pliable, fold easily, and create professional-looking burritos.
Three Proven Warming Methods:
Skillet Method (Recommended for Best Results):
Heat dry skillet over medium heat for 2 minutes. Place individual tortilla in hot skillet for 15-20 seconds per side until pliable and developing slight brown spots. This method creates subtle toasted flavor while ensuring flexibility.
Microwave Method (Fastest Option):
Wrap 2-3 tortillas in damp paper towel. Microwave on high for 20-30 seconds. Check warmth—if still stiff, heat additional 10 seconds. This method works quickly but doesn’t add toasted flavor.
Oven Method (Best for Large Batches):
Wrap stack of tortillas tightly in aluminum foil. Heat in 300°F oven for 10-12 minutes. Entire stack warms evenly, perfect when preparing multiple burritos simultaneously.
Keep warmed tortillas wrapped in clean kitchen towel to maintain heat and prevent drying.
Step 7: Layer Ingredients Strategically
Professional Assembly Technique—Order Matters:
Place warm tortilla on clean work surface. Visualize tortilla divided into thirds. Position all filling ingredients across lower third of tortilla, leaving 2 inches clear on both left and right edges.
Optimal Layering Sequence for Structural Integrity:
- First Layer—Rice (¼ cup): Acts as moisture barrier between tortilla and wet ingredients, preventing sogginess
- Second Layer—Bean Filling (½ cup): Main protein component and flavor foundation
- Third Layer—Cheese (2-3 tablespoons): Melts from residual bean heat, creating creamy binding agent
- Fourth Layer—Fresh Salsa (2 tablespoons): Adds moisture, acidity, and fresh vegetable flavor
- Fifth Layer—Sour Cream (1 tablespoon): Provides cooling creaminess and tang
- Final Layer—Avocado Slices (3-4 pieces): Healthy fats and luxurious texture
Critical Mistake to Avoid: Overfilling creates burritos impossible to roll properly. They burst during rolling or eating, creating frustrating mess. When in doubt, use less filling—you can always make additional burrito with remaining ingredients.
Step 8: Master the Professional Burrito Roll
Follow this proven technique used in Mexican restaurants:
- Fold Sides Inward: Bring left and right edges toward center, overlapping filling by approximately 1 inch. This contains filling during rolling.
- Tuck Bottom Edge: Fold bottom edge up and over filling ingredients, tucking tightly underneath them. This initial tuck determines final tightness.
- Roll Forward Continuously: While maintaining side folds, continue rolling away from your body. Apply firm, consistent pressure throughout rolling motion.
- Pressure Balance: Roll firmly enough to create tight cylinder but gently enough to avoid tearing tortilla. This balance comes with practice.
- Seam Placement: Place finished burrito seam-side down on plate. Gravity helps seal burrito closed.
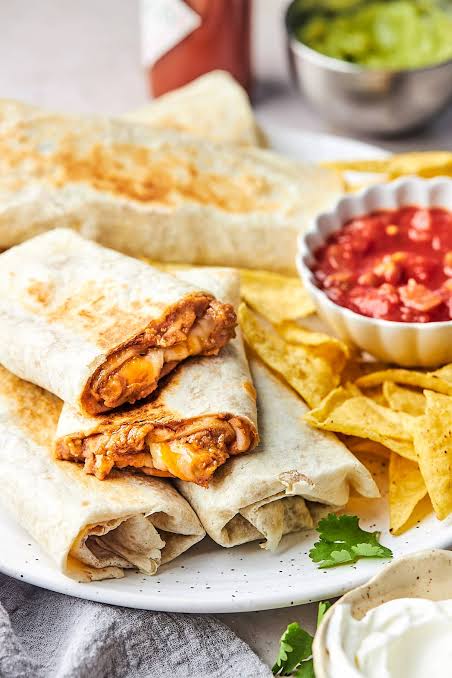
Step 9: Optional Crispy Finish (3-4 minutes)
For restaurant-style crispy exterior that elevates presentation and texture:
Heat dry skillet over medium heat for 2 minutes. Place rolled burritos seam-side down in hot skillet. Cook without moving for 2-3 minutes until golden brown and crispy. Carefully flip and repeat on opposite side.
Benefits of Crisping:
- Enhanced textural contrast between crispy outside and soft inside
- Heat seals edges, preventing filling leakage
- Improved visual presentation
- Ensures filling is heated through completely
Serving Suggestions and Accompaniments
Create an Impressive Red Beans Burrito Bar
Transform simple red beans burrito dinner into interactive experience by setting up garnish station:
Fresh Garnishes:
- Fresh cilantro leaves, roughly chopped
- Lime wedges (squeeze over burrito before eating—essential!)
- Sliced jalapeños, pickled or fresh depending on heat preference
- Diced white onion for sharp, crisp bite
- Thinly sliced radishes providing peppery crunch
- Multiple salsa varieties (verde, roja, pico de gallo)
- Hot sauce selection ranging from mild to extreme
Complementary Side Dishes:
- Mexican Rice: Fluffy rice with tomatoes, onions, and spices
- Refried Beans: Different bean preparation adds variety
- Tortilla Chips with Guacamole: Classic pairing everyone loves
- Elote (Mexican Street Corn): Grilled corn with mayo, cotija cheese, and chili powder
- Simple Cabbage Slaw: Light, crunchy contrast to rich burrito
- Black Bean Soup: For heartier, restaurant-style meal
Plating for Different Occasions
Casual Family Dinner:
Wrap each burrito in aluminum foil or parchment paper, cut diagonally through center to display colorful filling layers. Serve with chips and salsa.
Elevated Presentation:
Plate burrito seam-side down on warm plate. Drizzle salsa artistically across top, dollop sour cream, sprinkle fresh cilantro, and position lime wedge alongside. Serve immediately.
Creative Recipe Variations
Protein Enhancement Options
While these red beans burritos provide substantial protein, some occasions call for additional protein sources:
Shredded Chicken: Add 1 cup seasoned rotisserie chicken to bean mixture (+8g protein per burrito)
Seasoned Ground Beef: Brown ½ pound lean ground beef with taco seasoning, mix with prepared beans
Carnitas: Incorporate leftover slow-cooked pulled pork for rich, tender addition
Chorizo: Crumble and brown ¼ pound Mexican chorizo, combining smoky, spicy depth
Scrambled Eggs: Perfect for breakfast burritos, adding 12g protein and fluffy texture
Grilled Shrimp: Include 6-8 seasoned grilled shrimp per burrito for elegant seafood variation
Complete Vegan Adaptation
Transform these into entirely plant-based burritos while maintaining satisfying texture and flavor:
Cheese Replacement: Nutritional yeast provides cheesy, umami flavor without dairy, or use quality plant-based cheese shreds (cashew-based varieties melt most successfully)
Sour Cream Alternative: Cashew cream (blend soaked cashews with lemon juice and salt), store-bought vegan sour cream, or plain coconut yogurt
Increase Healthy Fats: Add extra avocado slices for creaminess without dairy
Boost Umami Depth: Incorporate 1 teaspoon soy sauce or white miso paste into bean mixture for savory complexity
Nutritional Note: Vegan version maintains impressive protein content through beans while significantly reducing saturated fat content compared to traditional meat and cheese burritos.
Customize Heat Level
Mild (Family-Friendly):
- Use mild chili powder or omit entirely
- Include only sweet bell peppers
- Serve hot sauce separately so individuals control heat
Medium (As Written in Base Recipe):
- Standard chili powder provides gentle warmth
- Optional jalapeño in salsa adds moderate heat
Spicy (For Heat Lovers):
- Add 1-2 diced fresh jalapeños directly to bean mixture
- Include ¼ teaspoon cayenne pepper with other spices
- Use pepper jack cheese instead of mild varieties
- Serve with habanero-based salsa
Extra Hot (Extreme Heat):
- Incorporate serrano or habanero peppers (remove seeds for slightly less heat)
- Add prepared hot sauce directly into bean filling
- Serve with ghost pepper or Carolina reaper salsa
- Warn guests about heat level!
International Fusion Variations
Indian-Inspired Red Beans Burrito:
Replace cumin with garam masala, add ½ teaspoon turmeric and ¼ teaspoon ground coriander. Serve with cooling cucumber raita instead of sour cream.
Mediterranean Style:
Add dried oregano and dried basil to bean mixture. Use crumbled feta cheese. Include diced cucumber, tomatoes, and olives. Serve with tzatziki sauce.
Asian Fusion:
Add fresh grated ginger and reduce cumin. Use sriracha for heat. Include pickled vegetables and fresh cilantro. Drizzle with sesame oil before serving.
Meal Prep and
Storage Solutions
Make-Ahead Strategies for Busy Schedules
Method 1: Fully Assembled Burritos (Maximum Convenience)
Assemble burritos completely following all recipe steps. Wrap each burrito individually in aluminum foil or plastic wrap, pressing out air. Label with contents and date.
Storage Times:
- Refrigerate: Up to 4 days
- Freeze: Up to 3 months for best quality
Reheating Instructions:
- From Refrigerator: Remove wrap, place on microwave-safe plate. Microwave on high 2-3 minutes, flipping halfway through heating cycle
- From Frozen: Microwave 4-5 minutes, checking temperature at 3-minute mark, or bake wrapped in foil at 350°F for 25-30 minutes
- For Crispy Exterior: Remove all wrapping, heat in skillet over medium heat 3-4 minutes per side
Method 2: Components Stored Separately (Freshest Results)
Store bean filling, cooked rice, and topping ingredients in separate airtight containers. Refrigerate up to 5 days.
Benefits:
- Maximum freshness for each component
- Customizable portions daily
- Versatile ingredient usage (use filling for tacos, nachos, or burrito bowls)
- Fresh tortillas provide best texture
Assembly: Reheat bean filling and rice separately, then assemble fresh burritos in minutes.
Method 3: Filling Only (Best Freezer Option)
Prepare double or triple batch of bean filling. Portion into 2-cup containers (perfect for single burrito batch). Freeze up to 3 months.
Usage: Thaw overnight in refrigerator, reheat on stovetop with splash of water, then assemble fresh burritos with newly prepared toppings.
Proper Storage Techniques
Refrigeration Guidelines:
- Wrap each red beans burrito individually in aluminum foil or plastic wrap
- Label clearly with contents and preparation date
- Store in refrigerator up to 4 days
- Keep separate from high-moisture foods that might cause sogginess
- Store in single layer if possible to maintain shape
Freezing Best Practices:
- Cool the red beans burritos completely to room temperature (maximum 2 hours out of refrigerator for food safety)
- Wrap tightly in aluminum foil, pressing out excess air
- Place wrapped burritos in freezer-safe zip-top bag with air removed
- Label bag with burrito contents and freeze date
- Use within 3 months for optimal quality and texture
- Important: Don’t freeze burritos containing fresh lettuce, tomatoes, or other high-moisture raw vegetables—add these fresh when serving
Troubleshooting Common Problems
Problem 1: Soggy, Wet Tortillas
Root Causes:
- Excessive liquid in bean filling
- Wet ingredients (salsa, sour cream) added too liberally
- Beans not drained and rinsed properly before cooking
- Assembling burritos while components still too hot
Effective Solutions:
- Cook bean filling until noticeably thick, not soupy or watery
- Gently dab excess liquid from salsa using paper towel before adding
- Ensure beans are thoroughly drained and rinsed
- Use rice as protective moisture barrier between tortilla and wet ingredients
- Briefly toast assembled burrito to create protective barrier
- Allow hot components to cool slightly before assembly
Problem 2: Torn or Broken Tortillas
Root Causes:
- Using cold, stiff tortillas straight from refrigerator
- Overfilling beyond tortilla capacity
- Using old, dried-out tortillas past freshness date
- Rolling too aggressively
Effective Solutions:
- Always warm tortillas properly before assembly
- Use moderate, reasonable filling amounts
- Purchase fresh tortillas and check expiration dates
- Feel tortillas through packaging—they should feel soft and pliable
- Keep spare tortillas ready in case of tears
- Roll with firm but gentle pressure
Problem 3: Burritos Falling Apart During Eating
Root Causes:
- Loose, casual rolling technique
- Incorrect folding sequence
- Overfilling with too many ingredients
- Not placing burrito seam-side down
Effective Solutions:
- Practice proper rolling method described above
- Always fold sides first before rolling forward
- Apply firm, consistent pressure throughout rolling
- Place finished burrito seam-side down so gravity assists seal
- Consider toasting to seal edges
- Cut burritos in half for easier handling
Problem 4: Bland, Underseasoned Flavor
Root Causes:
- Insufficient seasoning throughout cooking
- Skipping spice blooming step
- Using old, stale spices past their potency
- Missing acid component for brightness
Effective Solutions:
- Season generously and taste throughout cooking process
- Always bloom spices in hot oil before adding liquid ingredients
- Replace dried spices annually for maximum flavor
- Add acidic component (fresh lime juice) to brighten flavors
- Include umami elements like tomato paste
- Don’t be afraid to adjust seasonings to personal preference
Complete Nutritional Information
Per Burrito (Based on Standard Recipe as Written)
- Calories: 445 kcal
- Total Fat: 14g (18% Daily Value)
- Saturated Fat: 5g (25% DV)
- Trans Fat: 0g
- Monounsaturated Fat: 6g
- Polyunsaturated Fat: 2g
- Cholesterol: 25mg (8% DV)
- Sodium: 680mg (30% DV)
- Total Carbohydrates: 62g (23% DV)
- Dietary Fiber: 12g (43% DV)
- Sugars: 4g
- Added Sugars: 0g
- Protein: 18g (36% DV)
Vitamins and Minerals:
- Vitamin A: 15% DV
- Vitamin C: 45% DV
- Calcium: 25% DV
- Iron: 30% DV
- Potassium: 18% DV
- Magnesium: 20% DV
Percentage Daily Values based on 2,000 calorie diet. Individual needs may vary.
Why This Nutritional Profile Matters
Exceptional Fiber Content: With 12 grams of dietary fiber per burrito (43% of daily needs), these burritos far exceed most restaurant alternatives and support:
- Healthy digestive function and regularity
- Stable blood sugar levels throughout the day
- Increased satiety and natural appetite control
- Heart health through cholesterol management
- Beneficial gut microbiome
Substantial Plant-Based Protein: The 18 grams of protein per burrito provides:
- Essential amino acids for muscle maintenance and repair
- Extended fullness preventing between-meal hunger
- Stable, sustained energy without crashes
- Lower environmental impact compared to animal proteins
Heart-Healthy Fat Profile: Significantly lower in saturated fat compared to typical meat and cheese-heavy restaurant burritos while still delivering satisfying, rich flavors through healthy sources like olive oil and avocado.
Micronutrient Dense: High iron content supports energy levels, substantial vitamin C aids iron absorption, and calcium supports bone health.
Frequently Asked Questions
Can I use dried beans instead of canned beans?
Absolutely—dried beans offer several advantages including lower sodium content, significant cost savings (approximately 50% cheaper), and avoiding potential BPA exposure from can linings.
Preparation Method: Soak 1 cup dried red kidney beans in cold water overnight (8-12 hours). Drain soaking water completely, then cook beans in fresh water for 60-75 minutes until completely tender. This yields approximately 3 cups cooked beans, equivalent to two 15-ounce cans.
Critical Safety Information: Red kidney beans contain naturally occurring toxins (phytohemagglutinin) that must be destroyed through proper cooking. Always boil kidney beans vigorously for minimum 10 minutes before reducing to simmer. Slow cooking without pre-boiling can concentrate toxins and cause severe digestive illness. Canned beans are pre-cooked and safe.
How do I prevent beans from causing digestive discomfort?
Many people experience gas and bloating from beans. These tested strategies significantly reduce discomfort:
For Canned Beans:
- Rinse thoroughly under cold running water for 30-60 seconds to remove excess oligosaccharides (complex sugars causing gas)
- Drain completely before using
For Dried Beans:
- Soak minimum 12 hours, changing water 2-3 times during soaking
- Discard soaking water entirely before cooking
- Cook until completely tender—undercooked beans cause more digestive issues
Additional Strategies:
- Add cumin and epazote (traditional Mexican anti-gas herbs) to bean cooking
- Introduce beans gradually into diet if you’re unaccustomed
- Ensure beans are cooked thoroughly for better digestibility
- Stay hydrated—fiber requires water for proper digestion
Can I make these red beans burritos for weekly meal prep?
These red beans burritos are ideal for meal prep, many readers prepare large batches weekly:
Meal Prep Timeline:
- Fully assembled burritos: 4 days refrigerated, 3 months frozen
- Separate components: 5 days refrigerated
- Bean filling only: 5 days refrigerated, 3 months frozen
Professional Meal Prep Tips:
- Prepare 10-12 burritos Sunday for entire work week
- Label each burrito with contents and date
- Freeze half for later weeks to prevent flavor fatigue
- Pack with lime wedges and hot sauce for lunch boxes
- Reheat in office microwave or enjoy cold for different experience
Component Prep Alternative: Store filling, rice, cheese, and toppings separately. Assemble fresh daily for maximum freshness and texture—takes only 2-3 minutes with pre-made components.
What’s the best cheese for red beans burritos?
After extensive taste testing, these options work best:
Mexican Blend (Top Choice): Balanced combination of cheeses (typically Monterey Jack, cheddar, queso quesadilla, and asadero). Melts perfectly and provides authentic flavor.
Sharp Cheddar: Bold, tangy flavor stands up to robust bean seasoning. Melts well and adds depth.
Pepper Jack: Includes jalapeño pieces for additional heat. Creamy texture and subtle spice.
Monterey Jack: Mild, buttery flavor melts beautifully without overwhelming other ingredients.
Cotija: Authentic Mexican cheese with salty, tangy profile. Note: Cotija doesn’t melt, so crumble over finished burrito for textural contrast.
Vegan Alternatives: Violife, Follow Your Heart, and Daiya brands provide good melting properties. Homemade cashew cheese offers superior flavor and nutrition.
How do I achieve crispy burrito exterior?
Three effective methods create restaurant-quality crispy exterior:
Stovetop Method (Best Flavor):
Heat dry skillet over medium heat. Place rolled burrito seam-side down. Cook 2-3 minutes without moving until golden and crispy. Flip carefully and repeat on remaining sides. Creates slight char and toasted flavor.
Oven Method (Best for Multiple Burritos):
Preheat oven to 400°F. Lightly brush burritos with olive oil or spray with cooking spray. Place seam-side down on baking sheet. Bake 15-20 minutes, flipping halfway through, until golden and crispy all over.
Air Fryer Method (Fastest):
Lightly spray burritos with oil. Place in air fryer basket without touching. Cook at 375°F for 8-10 minutes, flipping halfway, until crispy and golden.
Result: Golden, crispy exterior with warm, creamy interior—textural contrast elevates entire eating experience.
What’s the best tortilla brand for burritos?
After testing numerous brands, these guidelines ensure success:
Fresh Bakery Tortillas (Best Option): Check local Mexican markets or grocery store bakery sections. Fresh tortillas are incomparably soft, pliable, and flavorful.
Packaged Tortillas Selection Tips:
- Check expiration dates—fresher means more pliable
- Feel through packaging for soft, flexible texture
- Avoid visible cracks or dry, brittle edges
- Look for minimal ingredient lists
- Choose tortillas without partially hydrogenated oils
Storage: Keep tortillas refrigerated in original packaging. Freeze extras for longer storage (up to 3 months).
Popular Quality Brands: Mission, Guerrero, and La Tortilla Factory receive consistent positive feedback from readers.

Professional Tips for Perfect Results Every Time
Tip 1: Invest in Quality Tortillas
Tortilla quality dramatically impacts final results more than any other single ingredient. Fresh, pliable tortillas make rolling effortless while stale, dry tortillas create frustration and torn burritos regardless of technique skill.
Tip 2: Build Flavor Through Layered Seasoning
Professional chefs season at multiple stages rather than once at the end:
Three Seasoning Stages:
- When sautéing vegetables (enhances vegetable flavor)
- When adding beans and liquid (seasons throughout)
- Final taste-test adjustment (perfects overall balance)
This layered approach creates complex, well-developed flavor impossible to achieve through single-stage seasoning.
Tip 3: Master Temperature Control
Medium heat prevents common cooking disasters:
- Burnt garlic (tastes acrid and bitter)
- Scorched beans (stick permanently to pan)
- Unevenly cooked vegetables (raw centers, burnt edges)
- Bitter, unpleasant spice flavors
Emergency Fix: If ingredients begin burning, immediately reduce heat and add 1-2 tablespoons water to deglaze pan, scraping browned bits from bottom.
Tip 4: Double Your Batch
Bean filling freezes beautifully while requiring identical effort whether making single or double recipe. Double the batch, freeze half in 2-cup portions. Future-you will be extremely grateful for ready-made filling.
Tip 5: Embrace Creative Customization
This recipe provides solid foundation, but best cooking happens when you understand principles rather than following instructions blindly:
After Mastering Basics, Experiment:
- Try different bean varieties (black, pinto, white beans)
- Explore global spice blends (curry powder, za’atar, berbere)
- Add seasonal vegetables
- Create signature flavor combinations
- Adjust heat levels to preference
- Develop family traditions around variations
Reader Success Stories
“I’ve made these red beans burritos weekly for three months. My teenagers request them specifically, and my picky eater asks for seconds. The cost savings versus restaurant takeout have been incredible.” — Sarah M., Denver, CO
“Finally found a burrito recipe that doesn’t fall apart! The detailed rolling technique made all the difference. I’ve taught this method to my college-age daughter for her apartment cooking.” — Marcus L., Austin, TX